In the world of Interior Design, one does NOT want form and function to ever compete!
The ideal is for the two to work together, both purposes fulfilled beautifully in the end product. Well, my dining nook proved to be a little challenging on both points. Let me take you through the whole process, ready for a roller coaster ride?
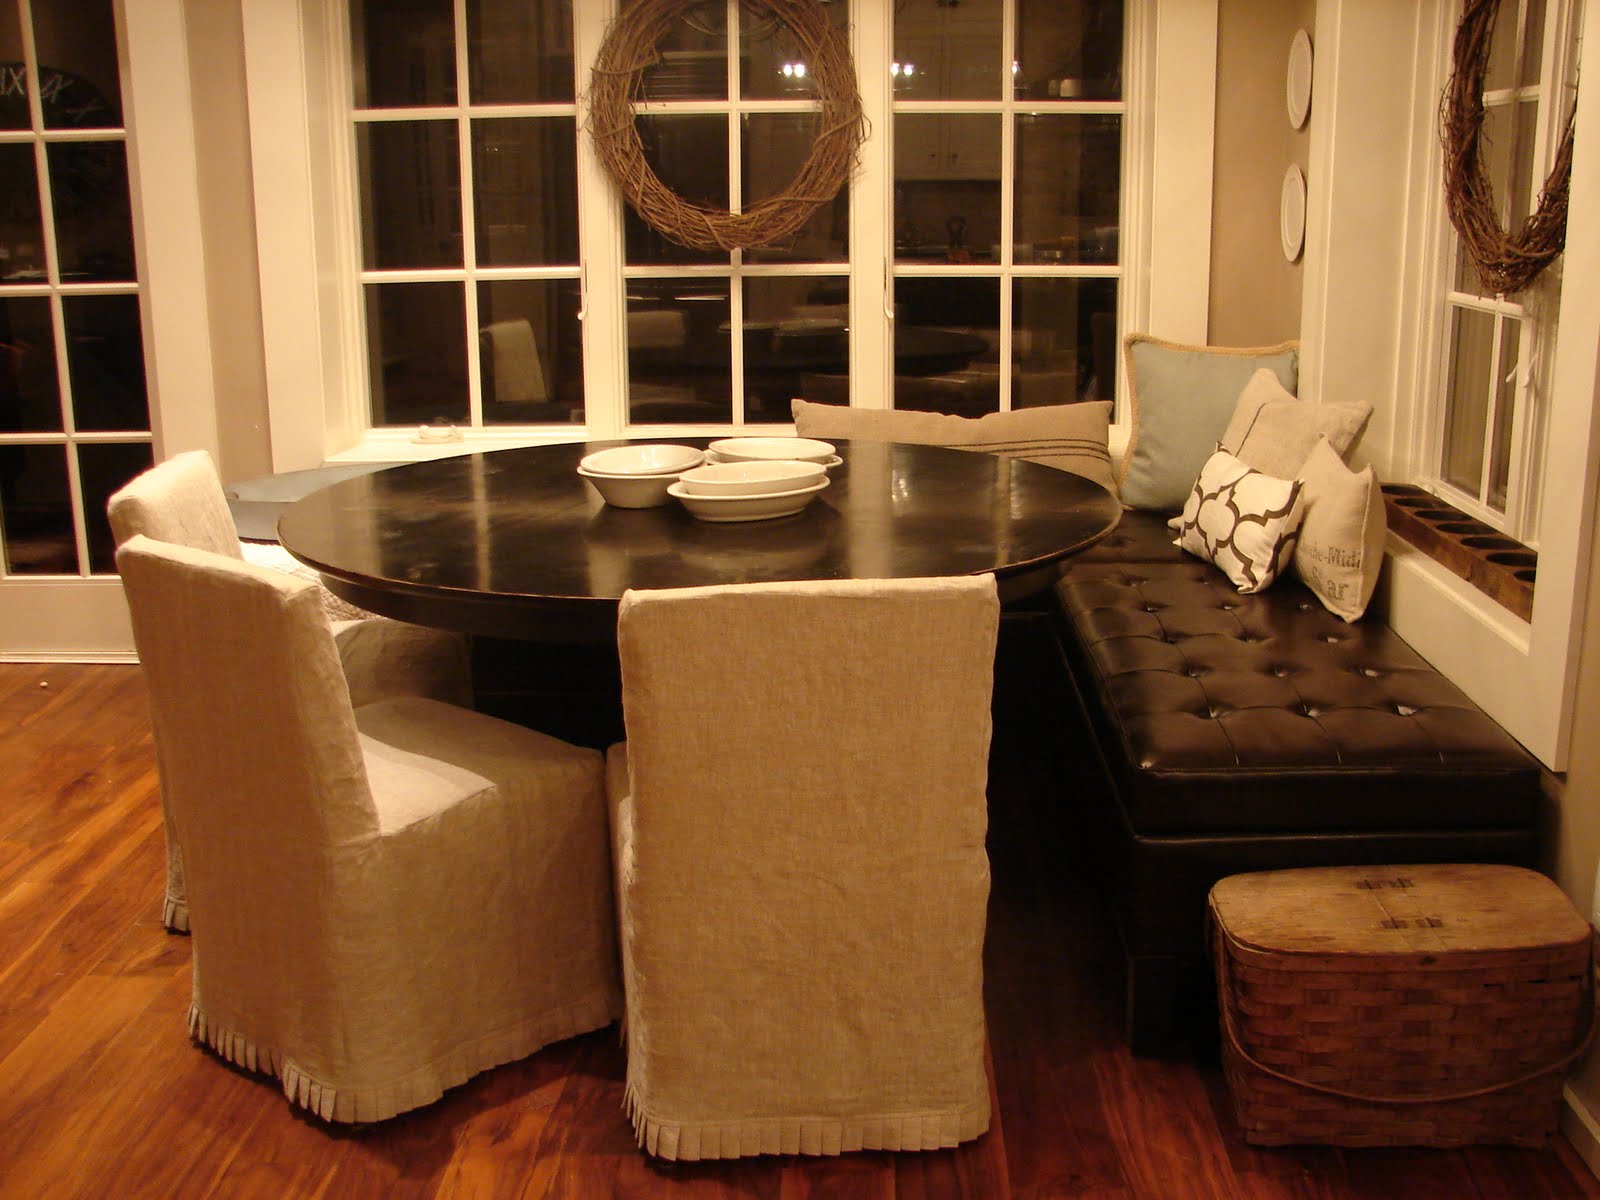
This is the Before.
Our 60" round table that I could never see myself parting with, it is chunky, heavy, and brilliantly made. I love these Parson Chairs too, they are so comfy, but I needed a different height. So I can now go visit them at my sil's house :) This space is actually very large. The left window extends on down out of this picture with a set of double french doors starting immediately after the window ends. I knew this space would seem 'hollow', when I first saw it on the building plans. Thankfully, I knew what would solve that spacial issue!
So here are the 'players'... each and every one bought on sale/clearance, hunted down for y.e.a.r.s!
Remember that I had the chandelier hung several years ago to be centered over the table knowing that I wanted the table and future banquette to fit these dimensions. I secretly dreaded that I probably would have to have a custom banquette made... chaching.. suffice to say I never told Shawn that custom may be the only option. Thankfully that was not the case. Whew! Things rarely work out this well, yippee! These ottomans are BEASTS measuring in at 53"Lx25"Dx19"H.
Next, I found the perfect replacement Parson chairs. I got these for a steal off Overstock.com. I've never shopped there before, but found these sold in 2 packs and I am thrilled with their make... although the yellowy leather is not the look I am going for, but that was a none issue.
And also several clearanced linen shower curtains that I purchased over 5 years ago, just cause they were yummy linen (machine washable, very important) and I knew that I would someday find a use for them. In fact a few of them DID spend some time as actual shower curtains in our old house.
Here is the inspiration photo for the Parson chairs. Flirty little slipcovers! Truth is, though, that I don't sew well, so those precious knife pleats at the bottom were a 'no go'... or so I thought....
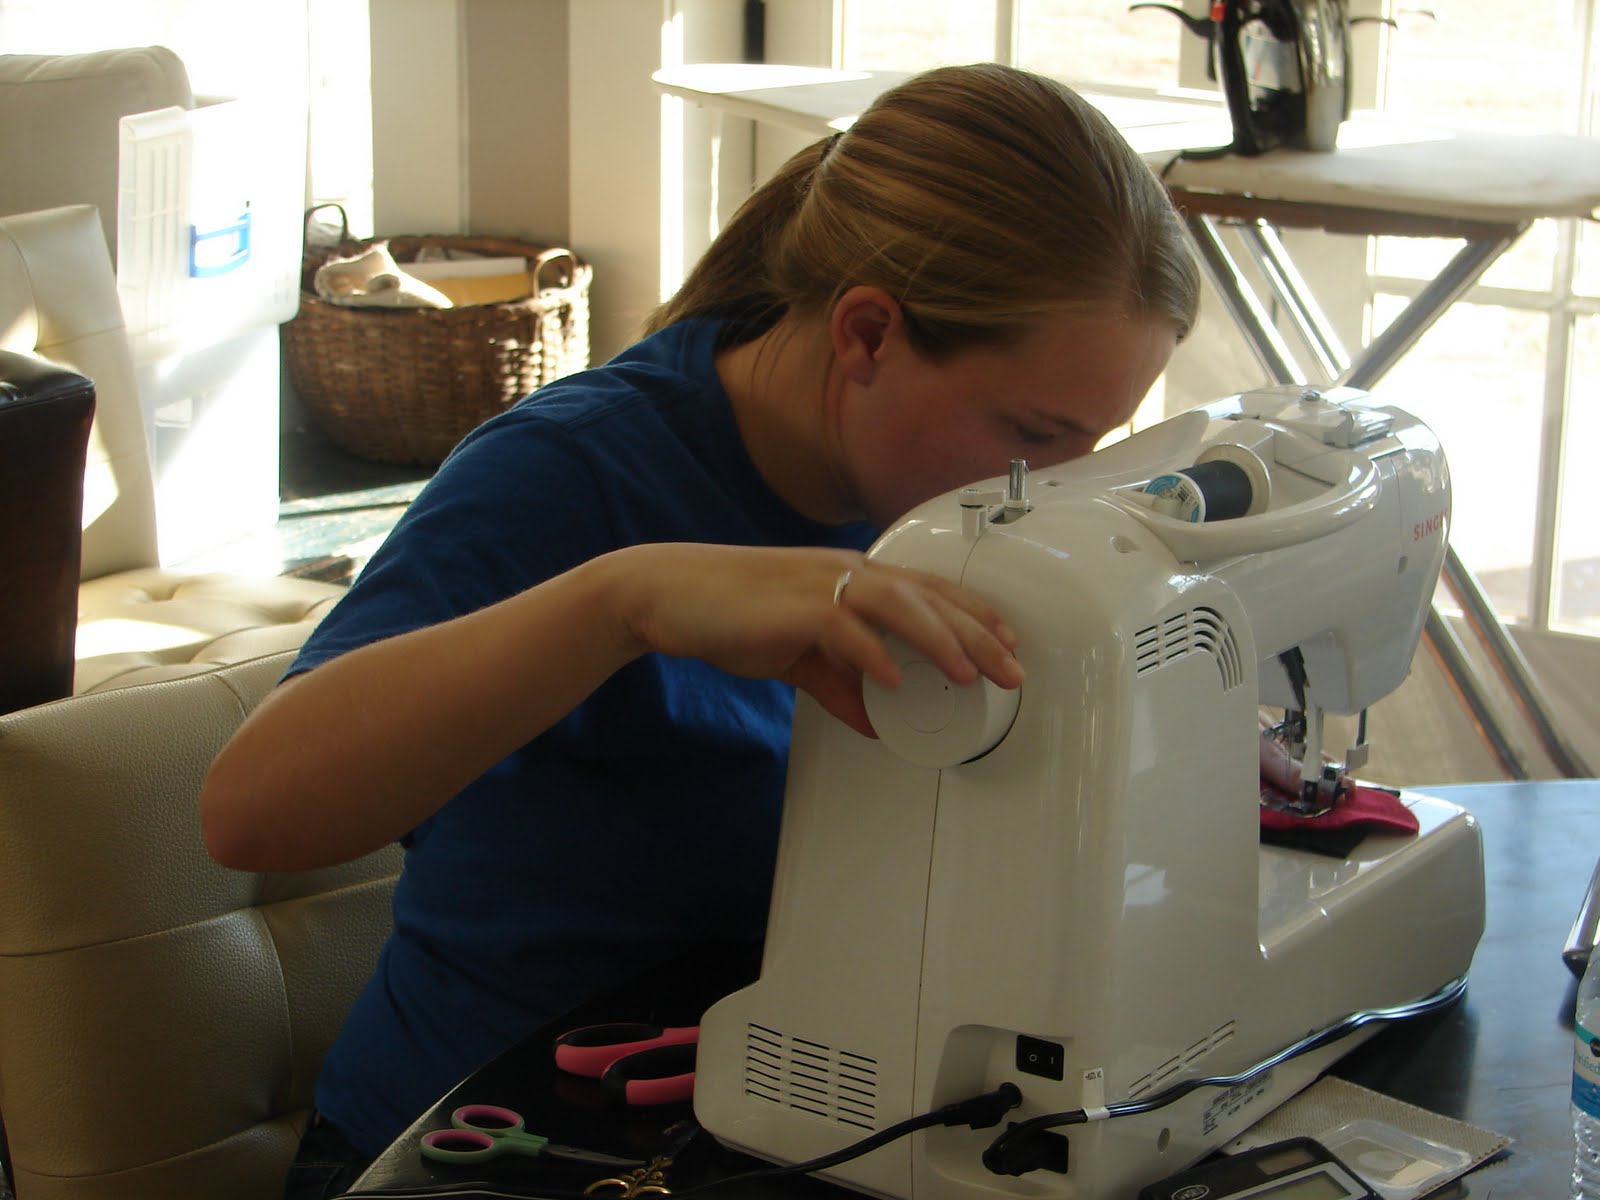
I started with some 50 cent/yard muslin fabric and made a pattern. Simply pinned sections on and trimmed it. The trickiest part was to decided where the seams would fall and I did not want a zipper like the inspiration photo.
Now, if I were making just one slipcover, I probably would have fitted the final fabric right onto the chair and sewed it. But I needed 4 slipcovers so that is why I made this muslin pattern. I then traced the pattern onto my linen, I had no waste of the linen this way.
The first slipcover, after cutting it out, I pinned seams together and sewed. But I still had to do some tweaking and little adjustments. The #2-4 slipcovers, after cutting out, I re-pinned onto the chair (mannequin) and then slipped off and sewed and they were perfect with no alterations needed.
And here is the slipcover sewed together, minus that intimidating little pleat, whimper.
After looking at 1 million tutorials on how to do knife pleats, and being very discouraged with all the measuring and pressing and measuring, and, and, and!!! I happened upon this little tool. I may or may not have shed a few tears. IF you ever need to make a knife or box pleat anywhere from 1" to 4", this is a dream tool. Go
here to watch the video... genius!
But not even my little pleater tools would eliminate the need for me to cut 8 yards (NOT FEET) of strips for the pleats. That is 8 yards PER chair!
Then I pleated ALL 32 yards of that fabric... this went quite fast, no whining needed here.
And look how adorable it is sewed on and topstiched. I need to pause here. Have a mentioned how much I love a little knife pleat... the only thing that comes close to my love for a knife pleat is a gorgeous box pleat. Not much of a ruffle gal, put pleats make me swoon!!
I made a slipcover for all 4 chairs, since I had to buy the chairs in pairs. But on an everyday bases we only use 3 chairs, but on occasions when we have family over, the table will still fit 4 chairs... so I made the 4th slipcover for those times. Note: I wanted the pleat to go to the floor, but after several days of using the slipcovers the fabric has some 'give' and the pleat was ON the floor. I knew it would get too dirty too fast like that, so a quick adjustment to one seam and they have been perfect ever since. yay!
Ready for the roller coaster... the competition between form and function?
It took me 3 leisurely days of on and off again sewing to finish the chair slipcovers. It took only a few hours to do the banquette slipcover.
Here are the ottomans placed in the corner. They fit under the windows/trim perfectly and Shawn screwed them securely to the wall so they do feel like builtins.
I found linen-like (machine washable) curtain panels on clearance and bought plenty. I decided to make two separate slipcovers for convenience when they needed to be laundered. Simple straight seams. Whala! I used a spatula to wedge the cover between the wall and the banquette. I had originally planned to sew on ties to the back and strap them down to the legs. But I ran out of time and Savannah needed to use the sewing machine so I just left them as is and decided to give them a 'test-run' during Christmas Dinner when my family would be over and using the banquette.
I did this adorable open corner seam tied with twill tape. I love the color of the leather on the ottomans and thought this was a clever way to still get a peak of it.
Here's the Dining Nook just hours before our family came for Christmas Dinner.
These pillows I just gathered from around the house. I will eventually make even more pillow to cushion the back of the whole banquette.
So here is what I love about the nook in this picture: it looks soft and yummy, linen heaven, still has very clean lines but a tad feminine and flirty, the whole nook feels 'filled' but not cluttered, the height is now perfect with the chairs and the view out the windows is unobstucted, it feels calm.
SCREEEEEEECH! Then real life happened!
My poor family members whose placecards forced them to sit on the banquette had a very frustrating showdown with a slippery, shifting, cumbersome slipcover! I love my brother Nate dearly at this very moment for not completely ripping off my new slipcover and screaming in frustration right in the middle of Christmas Dinner. Nate is not known for timid responses, but he showed great restraint. When anyone tried to scoot in to the corner... the slipcover did not slide. When anyone got in and out to get seconds of my YUMMY dinner... the slipcover pulled out from behind the banquette. It was hard for me to watch, whimper.
I think I hid my disappointment well... I stayed calm. I told myself that at least the chair slipcovers performed amazingly and they were the doozies to sew, breathe, breathe... maybe some minor modification could save the banquette slipcovers.
So, a few days later, I sewed those originally planned ties to the back of the banquette slipcover and fastened them to the back of the banquette. Trial run again. Nope. Nada. Failure. The slipcovers still wanted to bunch up. You still could not slide into the banquette. GRRRRR! I have slipcovered furniture elsewhere in the house, I do not expect perfection from them, I prefer tailored/fitted slipcovers but a little non-perfection is to be expected from slipcovers. But the banquette slipcover was not functioning on any level but CUTE.
With a huge sigh, I removed the slipcover entirely off the banquette. I have spent hours researching other alternatives, but for now... I find that I am not all that bummed. Not even the money spent on the slipcovers is a loss because I have many slipcovering projects yet in the works.
The facts are these...in the few days between when Shawn bolted the 'naked' ottomans to the wall and I finished the banquette slipcover... the kids lived in this new corner. They could sit indian style on the deep seating. Christian even did school lounged on the banquette while enjoying snacks. The kids have lingered here to play games. They didn't have to fiddle with, wrestle with, and be delicate with the leather banquette. At least I knew that the layout and composition of the space was working.
So here is how the banquette looks as of this morning. Not bad, Huh?!?
Truth? I actually like the contrast of the dark leather with the linen chair slipcovers!
In my mind's eye I just always felt the leather would be cold. But the color is yummy! The little tufted spots will be crumb catchers, for sure, but the leather is easy to clean and easy to slide in to.
While this specific tray is a bit too large (I just grabbed it for the photo), I love how the banquette extends well past the table and I can have a tray (now on the look-out for the perfect one) here at the end full of magazine or napkins, etc. Toss on a few throws and add more pillows like originally planned and I think I haven't lost the warmth of this corner either!
So while I am not 100% convinced this is a final project or a good holding pattern... I am thrilled with how it is looking and working. Form AND Function!
Now my next project is to refinish my beloved table. It has seen better days, but I still love it dearly, so a facelift is all that is needed. AND... our 9' harvest table has us concerned that the sheer weight of that beastly slab of wood is splitting... may be building another... hubby still mourning those facts so I shall start with the round table and let him 'digest' the harvest table for a tad bit longer, snicker!!


 "Home is an invention on which